IT & Ops Data with Snowflake Part II
Working with Data in Snowflake
Welcome to Part II of my miniseries blog around Snowflake with IT & Ops Data. If you have not read Part I, you may click that link to read it first. Data has always been very important, and Snowflake just makes using the data a ton easier than we have ever had before. This post will focus on some basic ways one can work with data with in Snowflake. For this blog I will be focusing on JSON data stored in Snowflake columns. JSON documents are very common all over tech. Especially in things like REST APIs, so if you haven’t worked with JSON you will work with JSON data most likely at some point.
Snowflake can store semi-structured data in columns natively using the variant data type. This allows IT and Operations people to ingest JSON data in their data pipelines without having to transform the data beforehand. Just ship the JSON data as is right to the platform.
IT and Operations folks have also most likely dealt with some sort of SQL based database at some point in their career. Things like: MySQL, Postgres, Oracle, Microsoft SQL, or another SQL based database. So, you might already be familiar enough with SQL. This is another great thing about Snowflake is that you can use all the SQL experience you have gained over the years and apply it right to the platform. There is no esoteric proprietary query language used here, just simply SQL. The best part as an IT & Ops professional is that Snowflake uses the power and scale of the cloud, meaning IT & Ops folks don’t ever have to worry about managing the service and platform. No knobs to adjust, no database configurations to deploy, so all you have to do is use the product and let Snowflake take all of that heavy lifting off of your plate!
Jamf Webhooks Right to Snowflake Tables
Since Jamf provides example Webhook Data in their online documentation, we will just use their examples in Snowflake for this blog post. Snowflake can parse JSON natively, meaning you can store JSON data in raw form right in your database. So, lets get started!
Create A table with JSON Data
Let’s create a table first, so we can insert some data into it:
Query:
|
|
the above table has two columns. A “date” column which is set to a varchar data type, json_data which is set to a variant type since JSON is a semi-structured data type. I added
rawinto the table name to represent a table that might receive raw data from a data ingest pipeline.
An empty table is no good without any data in it. I am just copy/pasting the actual example data from Jamf’s developer documentation site linked above.
Query:
|
|
I repeated this process a few times to get several rows of data. I just picked a few random examples of the hooks from Jamf’s website and reran the above query. Snowflake has a built in parse_json function that will interpret the string as JSON data, and produce it as a variant data type
Let’s check our work but running a SELECT * on our table and see what sort of data we get back.
Query:
|
|
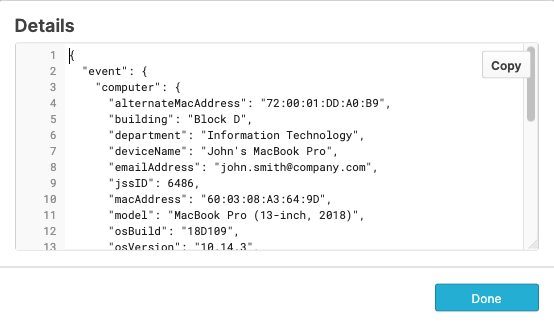
Screenshot of rows:

Screenshot of some JSON data:
Parsing the Jamf Data
Now that we have some data in there, lets look at how one could get some data out of it:
Query:
|
|
Results:
|
|
In the above query and results you can see that Snowflake can just natively parse raw JSON/Variant data stored in a column.
No big deal, right? The syntax is pretty simple. It is simply one single: to tell Snowflake to interpret the rest as JSON/Variant. After that
first : you can swap back to . and, you don’t have to hold down the shift key a ton. It is really that simple and
at the same time powerful.
Organizing Your Data and Leveraging Views
With data like Jamf Pro Webhooks, you probably want to organize your data in a way where each event type is in its own
table. We will first create a new table, just like our previous one, and this time we will use it for check-in hook events
from Jamf Pro. It would not make a ton of sense to toss two or more different types of hook data sets in the same table.
Event data is about capturing what events are taking place and mixing two different event types has no benefit and would
make your queries way more complex. Since we already have our table from before that worked, we can use like to
create another table just like it.
Query:
|
|
Following the same steps previously mentioned in this blog post, I inserted some check-in webhook events into my new table I just created using the example data from Jamf’s website. Now that the raw JSON example data is in a fresh table I can now look at creating a view. For more information please check out Snowflake’s Documentation on views. I will only share a few pieces of the data in my view that might be relevant to the requester of said data. Data owners can always pick and choose what they share with other people and teams using Snowflake, and this is such a fantastic thing!
Query:
|
|
NOTE: Jamf Pro Webhooks use epoch timestamps, so I decided to type cast it as more readable time stamp. This is another great quality feature of Snowflake. See the screenshot and query results below, it displays a human-readable time stamp now. This query also is only sharing a relevant data set to the view, and not the entire raw data of the hook itself. I also added a
_vto the view name to visually indicate it is a view.
The short version is that a view can turn query results into a table. This is a very cool feature, and useful to just convert queries you write into a view. I am also specifying data types here, please refer to the official docs to learn more about data types in Snowflake. Let’s take a look at the data set we just created with a view.
Query:
|
|
Results:

|
|
Features like this come in very handy when you want to share data to other people and teams. The view above is a view that just shows some basic data for the webhook event of client check-in. When sharing data to others, they probably do not need to access the raw data. Parts of the data could be confusing, not needed, or even considered confidential. Features like this give the data owners the power to share exactly what they want, nothing more, nothing less.
Data Sharing with Snowflake
Data sharing is such a game changer. It is hard to describe in some ways, because I feel that you have to experience it to really see the absolute beauty that data sharing is. In the past I have had to deal with many APIs, CSV reports, and in some cases I had to log into an app to generate a report and download it. This is time-consuming, and very labor intensive. The end result was typically a bunch of scripts, emails with attachments, and then me having to cobble together data from these sources and documents. I never have to do any of that ever again. That is a thing of the past, a relic, things lost in time like tears in the rain.
A quick high level example of how data sharing empowers IT & Ops workers could be around inventory and asset control. An IT & Ops
professional could have access to basic HR data (think employee directory), asset data in the Org’s asset tracker, and then
MDM data from the MDM tool you use. All of which is directly ingested into Snowflake. Zero API calls, zero CSV parsing, and
definitely not logging into random apps to run reports manually. With this simple data set I can check if a terminated
employee’s laptop is checking into MDM, or if the asset in the asset tracker is not set to some sort of term hold state.
One could also ensure that every FTE of the Org has a primary use computer assigned to them by simply joining the HR data to the
asset tracker data, and then filtering for every full time employee that is missing a primary use computer.
Role Based Access Controls (RBAC)
Role Based Access is an industry standard that is used in many things. The general idea is you create roles to do certain functions, and only grant those roles the least amount of permissions and access they need to do their jobs. A user of a system will assume that role when they authenticate to the tech stack they are working in. Here are the official docs for how Snowflake handles access and ownership of objects with in Snowflake itself.
Using part of the example above, lets assume Security Engineering has a request into IT to consume data around end user computers checking into the Org’s MDM. For the use case we will also use that they are trying to track employee laptops where the employee has left the company, but the laptop is still acitvely online and checking into MDM. This would be considered a risk the Security Team wants to monitor and alert on.
Let’s create a role called SECENG_BFF, since IT and Security should be best friends forever. Grant that role SELECT
access to the view we just created before. This will be the view we are data sharing to Security Engineering, so they
may audit and monitor data in the scenario described.
Query:
|
|
Roles do need some level of basic access to warehouses and databases to access views and tables with in those objects.
This example is not advice on how anyone should organize and use role based access. However, now we can test our role to
see if it can SELECT against the view we just created.
|
|
If you get a return on the data, then you have now successfully created a view based off raw data, created a role to
access that data, and finally granted a person that role. Folks working with in Snowflake can assume roles through the
App GUI, or by running a query USE ROLE <ROLE_NAME>, and users can have multiple roles. My SELECT * query ran fine,
and returned all the same results in the example earlier in this blog post.
Data Sharing is Limitless
In this post I have only really touched on internal data sharing between teams with in your Organization. Snowflake also has an entire platform for third party data sharing, called the Snowflake Data Marketplace
IT and Operations teams now have the ability to directly share and directly consume data from with in your Organization. This enables people to access and consume data freely with your Org once granted access. Often IT & Ops teams need to share data with Security, and Compliance and Governance teams. Data sharing makes this extremely easy. It also allows data owners to share only the exact data they need to share, and scope the data to specific teams or people. IT & Ops teams can also easily consume data from other teams as well, and this is such a wonderful thing.
When you share the same data across teams, then all teams are looking at the same data. Historically, you might have had an experience where data is not centralized and shared from the same data sources, and ended up with different teams having different data sets. When you have the ability to ship all your raw data to a single data platform and share your data with people and teams across your Org, you get rid of all those legacy methods you used to have to deal with.
Concluding Part II
Thanks for reading if you got this far. This concludes Part II of my miniseries on being data driven with Snowflake. The
thing I would like to close on is that Snowflake makes data ingest extremely easy. Most APIs or data shippers can ship
JSON data natively, and Snowflake can just consume that natively. No need to transform your data in the shipping and ingest
process. Then having the ability to just work with variant data with in Snowflake is honestly just sort of mind-blowing.
This also means the integration opportunity for IT & Ops tools is exponentially broad. If you can get IT & Ops JSON data
into cloud storage you are pretty much just done at that point. The rest is using the data in Snowflake itself.
There will be a Part III, but I have not fully planned out what that will be just yet, so stay tuned please.